Java Spring Docker Compose Example
Docker-compose setup and Dockerize a Spring Boot Microservice using docker-compose in Linux Mint
In the previous story, we saw how to do Docker setup and dockerize spring boot application. Here we will focus on docker-compose.
Lets first understand what is Docker-compose. Compose is a tool for defining and running multi-container Docker applications. With Compose, you use a YAML file to configure your application's services. Then, with a single command, you create and start all the services from your configuration. The features of Compose that make it effective are:
- Multiple isolated environments on a single host: Compose uses a project name to isolate environments from each other.
- Preserve volume data when containers are created: Compose preserves all volumes used by your services. It ensures that any data you've created in volumes isn't lost.
- Only recreate containers that have changed: Compose caches the configuration used to create a container meaning you can quickly make changes to your environment.
Install Docker-Compose
first, install the Docker for your OS as described on the Get Docker page.
To install docker-compose on Linux Mint (Ubuntu) please follow instructions: https://docs.docker.com/compose/install/#install-compose
Post-installation do check the docker-compose version
$ docker-compose --version Dockerize a Spring Boot Application using docker-compose
Please follow this story to create an application or microservice.
Go to Github location(https://github.com/shivrajjadhav733/springboot-docker-compose) and pull the code.
Define service in compose file
Please see project structure
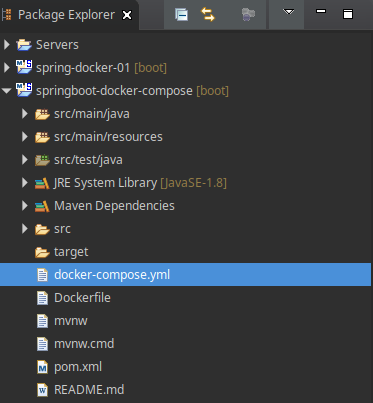
Please see docker-compose.yml in Project directory.
          version: '3'services:
              springboot-docker-compose-app-container:
              image: springboot-docker-compose-app:1
              build:
              context: ./
              dockerfile: Dockerfile
              volumes:
              - /data/springboot-docker-compose-app
              ports:
              - "8081:8081"
Compose file defines one service springboot-docker-compose-app-container:
- Uses an image that's built from the
Dockerfilein the current directory. - Forwards the exposed port 8081 on the container to port 8081 on the host machine.
-
volumeskey mounts the project directory (current directory) on the host to/data/sprinboot-docker-compose-appinside the container, allowing you to modify the code on the fly, without having to rebuild the image. volume is analogous todocker volumn create
All you need to do now is open terminal, go to project directory and run command to create and start containers.
$ docker-compose up or $ docker-compose -f <compose file name> up or $ docker-compose up -d
Note: you can avoid -f if your file name is docker-compose.yml . If you want to run your services in the background, you can pass the -d flag (for "detached" mode)
Compose builds an image for your code, and starts the services you defined. In this case, the code is statically copied into the image at build time.
Once the container started successfully, you can go to browser and check if its working fine: http://localhost:8081/
You will see "Hello Docker Compose World" displayed on screen.
Switch to another terminal window, and type docker image ls to list local images. You will see image of your application. You can also type docker ps to list containers.
If you started Compose with -d, stop your services once you've finished with them. Below command will stop containers.
$ docker-compose stop You can bring everything down and remove all containers entirely with command:
$ docker-compose down If you make any configuration change to a service and run docker-compose up to update it, the old container is removed and the new one starts under a different IP address but with the same name. Running containers can look up that name and connect to the new address, but the old address stops working. If any containers have connections open to the old container, they are closed. It is a container's responsibility to detect this condition, look up the name again and reconnect.
Base Commands
Some of the base commands can be seen here: https://docs.docker.com/compose/reference/overview/
Networking in Compose
By default Compose sets up a single network for your app. Each container for a service joins the default network and is both reachable by other containers on that network, and discoverable by them at a hostname identical to the container name. Network is created behind the scene using command:
$ docker network create In this sample case project directory name is: springboot-docker-compose
When you run docker-compose up, the following happens:
- A network called springboot-docker-composs_default is created.
- A container is created using springboot-docker-compose-app-container 's configuration. It joins the network springboot-docker-composs_default under the name springboot-docker-compose-app-container.
Each container can now look up the hostname springboot-docker-compose-app-container and get back the container's IP address.
If looked at docker-compose.yml it is important to note the distinction between HOST_PORT and CONTAINER_PORT. Networked service-to-service communication use the CONTAINER_PORT.
Join our community Slack and read our weekly Faun topics ⬇
If this post was helpful, please click the clap 👏 button below a few times to show your support for the author! ⬇
Source: https://faun.pub/docker-compose-setup-and-dockerize-a-spring-boot-application-using-docker-compose-in-linux-mint-d9b70a2ce830
0 Response to "Java Spring Docker Compose Example"
Post a Comment